Thursday, October 31, 2013

Roasted Pears: Easy Fall Dessert


This is a great simple dessert that also has the added advantage of being really quite healthy. It also happens to be gluten and dairy free. A great paleo or vegan dessert as well.

I first served this dessert to a group of my family members who were visiting from out of town. We had a large dinner of my favorite ribs, with mashed potatoes, fresh tomatoes with basil, garlic, olive oil and vinegar, and other fresh vegetables from a farm box I picked up. For Dessert I wanted something just as fresh, but I also wanted it to be really easy to put together with people there. This fits the bill. 

Roasted Pears With Coconut Whipped Cream:

For the Pears:
Half a pear per person, slightly firm
A sprinkle each of cinnamon and cardamum
About 2 teaspoons real maple syrup per pear half

For the Whipped Cream:
A can of Whole coconut milk in a can (or Trader Joe's Coconut cream, in a can)
           Chilled well (I usually just keep a can in the fridge in case I want it)
A teaspoon vanilla extract
A tablespoon of maple syrup
A pinch of ground cardamom

Directions:

Preheat the oven to 375 degrees, put the beaters and mixing bowl into the freezer to chill

Wash the pears, cut them in half length wise and use a melon baller to scoop the seeds out. Sprinkle the pear with a bit of cinnamon and cardamom and then lightly pour maple syrup on them (about 2 teaspoons). Place in the oven for 30 minutes to bake until soft.

About 5 minutes before the pears are done get your mixing bowl out of the freezer and set it up. Open up the can of well chilled coconut milk and you should see a firm thick white layer. Scoop out just the very firm white layer into the mixing bowl, leaving behind the clear liquid for another use. Start mixing the coconut milk in the mixer on medium speed, add in the vanilla, maple syrup, and cardamom. What should happen is the coconut milk should become fluffy and look like whipped cream.

Serve the pears hot with the whipped coconut milk on top. We also served dark 80% chocolate with them and some people put small pieces in the middle of the pears so it would melt, that was great!


Wednesday, July 17, 2013

Planning A Party

Every year I get to plan at least 4 birthday parties. My kids, mine, and my husbands. This year is no different and as I approach my husbands birthday I am getting into the nitty-gritty of planning his party.

Over the years I have found a process that works to keep me organized, on track, and well not to insane during the day of the party.

The first thing I do is figure out the guest list. Then I figure out a theme (mostly for invitations at the adult stage). Next I invite people making sure to try and give them a month notice so they have time to plan around it, but honestly there are times that I am not perfect at this aspect of it. 

The very next thing I do is go to Pinterest and start a board dedicated to that party. This is probably my favorite part of party planning because I can imagine I have limitless possibilities, of course this means that I usually have to bring myself back down to reality of a budget and time. It still really helps with organization, especially because I am a visual person. 

On Pinterest I look for menu ideas that might fit into the theme, cake designs, decorating ideas, and entertainment ideas. Later I can go back and make my lists using these ideas. 

About a week before the party I really figure out the menu, decorations, and any entertainment ideas that I am going to use for the party, along with the number of people who are coming. I start a list with the menu, decor, and games written down under their own sections. Then I make a grocery list and a list of other items that I will need. I try and do this all on one piece of paper in sections so I can see it all at once. 

At the beginning of the week I try and buy anything that will need time to make for decor or games. Then in the evenings when the kids are in bed I start working on those things. 

In the morning the day before the party I try and do all my shopping and cleaning. Then that evening I try and do prep work. I usually make the cake but don't decorate it, do anything that can be done ahead like washing produce. 

The day of the party is all about decorating and making food

Here are a few links to Pinterest boards I have done for parties in the past in case you want to take a look at them. The next party I am holding is for my husband's birthday on Friday and it is a BBQ theme. I hope maybe letting you in on my process will help you a bit with your next party. 

http://pinterest.com/ecarleyroe/husband-birthday/

http://pinterest.com/ecarleyroe/ak-birthday-party-ideas/ (this was a bird themed party for my little girl)

http://pinterest.com/ecarleyroe/ab-bday-party-ideas/ (This was a superhero themed party for my little boy)

Do you use Pinterest at all? Do you make a board for your parties?   


Thursday, June 13, 2013

Father's Day Photo Shoot & Gift


I did a lot of searching online for Father's Day ideas and how to include the kids in making the gift for Father's Day. I discovered many photo shoots of the kids along with prop ideas and framing ideas. You can check out many of the ideas I came upon on my Pinterest board about Father's Day. I took a few of these ideas and combined them to get what you see above.

I really liked the idea of the kids finishing the sentence I love Daddy because... and using their answer in the photo shoot. I also thought it was really cute to see kids dressed in their Father's work clothes. I think it would make a nice sequence if we did it year after year to see how much they have grown. I also really like the sign for I love you in sign language, I grew up using it with my mom and have used it with the kids so I really liked the tracing of the child's hand and having it folded to say I love you in sign language and holding a heart.

Each of the kids also answered questions about Daddy (like what is his favorite food, what does he do at work, what is is favorite thing to do, etc). I plan to do that year after year as well and see how the answers change.

I would love to hear of other ideas that you come up with so I can start coming up with things for next year or birthday which is right around the corner. :)


Wednesday, June 5, 2013

Ricotta Stuffed Apricots


The other day at the super market I saw these beautiful orange apricots and felt like I really needed to find a way to use them. I decided to experiment with making stuffed apricots with sour cream or ricotta and rosemary.

I ended up trying out both and found that I really preferred the ricotta because there is already a lot of tartness from the apricots so the sour of the sour cream did not counter that flavor enough for me. I added a little bit of finely chopped rosemary and maple syrup to the cheese, scooped the mix into the apricot and broiled it until the cheese was just lightly browned.

The combination was amazing. I tart flavor of the apricots combined with the slightly sweet cheese and woodsy rosemary was amazing. I was mostly amazed at how filling this was considering the small size of an apricot and the small dollop of ricotta it takes to fill the space where the pit was.

This recipe became my breakfast for the next few days and I am sure to revisit it throughout the apricot season.

Enjoy!

2 firm but ripe apricots cut in half with the pit removed
2 tablespoons ricotta
1/8 teaspoon finely chopped rosemary (sprinkle it in starting with half the amount and then taste to see if you want to add the full amount)
2 teaspoons maple syrup plus a slight drizzle for the top

Mix the cheese, rosemary and 2 teaspoons of maple syrup together. Scoop into the place where the pit was in the apricot filling generously. Drizzle very slightly with maple syrup. Broil until lightly browned.

YUM!

My kids preferred to eat the ricotta mix on slices of apple. Another version of this uses cinnamon and vanilla in the ricotta with some maple syrup. This makes a great dip for apples. 

UPDATE: A Vegan Version I just made recently that is amazing:
 You make these the same way as the non-vegan version but I made cashew cheese to go in them instead of ricotta or mascarpone. Here is the deal with cashew cheese:

Fill a large container (that can hold at least 4-6 cups of stuff with 1 cup of raw cashews and the rest with boiled water that has cooled just for a minute or two. Allow it to sit at least 1 hour but it is even better (smoother end result) if you can let it sit all day or over night and most of the day. 

Next drain the water into a measuring cup and add to the cashews about 2 tablespoons maple syrup and 1/4 cup of the reserved water. Using a very good blender (Vitamix or that sort) or an immersion blender on high speed mix these together until smooth. If it does not seem to be blending you may need to add a bit more water but be cautious about this and take it slow doing it just a tablespoon at a time. You want this to be very smooth and thick about the texture of mascarpone cheese. 

Follow the rest of the recipe as above in the non-vegan version.  

Wednesday, April 24, 2013

Earth Day Craft: Earth and Other Planets

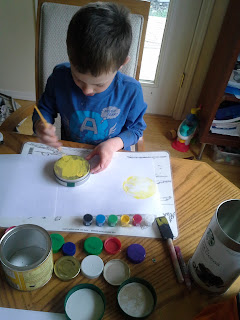
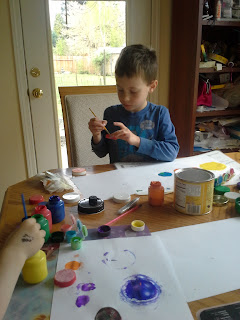
This month my kids and I have been doing activities and crafts that center around Earth day for the month of April. The first of these (and my favorite) was using container lids left over and saved from different things, like milk jugs, to stamp the planets of the solar system. We took several different sized lids and set them out with paints and brushes and two pieces of paper tapped together. We painted the flat side of the lids and stamped the sun and planets in order (my six year old stuck to that plan, my three year old just stamped wherever).

We used a picture of the solar system for guidance and my son labeled the planets. We also read a book called, If You Decide To Go To The Moon by Faith McNulty, which shows a kid preparing for a trip to the moon in a rocket. He gets supplies and games and during the trip talks about being lonely. He gets out on the moon and walks around in his space suit. He discovers that the moon is lacking a lot of the lovely things that the Earth has. On his way home he realizes how special the Earth is because it is the only place with the ability to have life which creates so much beauty and so we really need to protect the Earth.
                                                               

This was a super easy project that we put together last minute but is great for science, art, motor skills, and writing (if you label planets).


Wednesday, April 10, 2013

Marbled Paper Art

I have to confess right from the start, this craft was not mine in the making, but it was so much fun that I had to share it with everyone. 

My Grandparents were visiting for a few weeks in March and my Grandma brought along some craft supplies and a project idea that she was just so excited to have everyone do. She set up by putting down a disposable table cloth a tin baking dish slightly larger than 8 by 10 and about 4 inches deep, cans of shaving cream, two boxes of food coloring, stir sticks, card stock paper cut to maybe 7 by 9 inches pieces, and a squeegee.

She had us fill the tin with a bunch of shaving cream and then flatten it out using the squeegee (or hands and by the way super flat is not that important here). 


Next choose a few colors of food coloring and place a few drops around on the shaving cream. You want some space between the drops and you want it to span the entire pan. 
Next take the stir stick and place in in the shaving cream and move it through the drops of food coloring to make a design, any design will do. 
Next lay your paper down flat into the shaving cream and rub the back so that the front comes into complete contact with the shaving cream. Then pull it straight up and lay it on the table cloth. 
Grab the squeegee and use it to carefully wipe away the foam. 
Then set the paper out to dry and repeat as much as you want using the same shaving cream and just adding new colors or with all new shaving cream. 
And Grandma (Great Grandma to some at the house) gets to start hers finally:
Super fun, good sensory play, color theory/naming/mixing, art project that can later be a writing project, because now we have lots of pretty paper to send letters with. :)


Tuesday, April 2, 2013

Amazing Vegan and Paleo Chocolate Cupcakes


 I recently found a recipe for a muffin that is really moist and incredibly healthy. I decided that there must be a way to change that recipe to make a healthy cupcake that would accommodate our recent wheat and dairy allergies. I set out to create a chocolate cupcake with a chocolate frosting. I used the recipe from the chocolate tart I made recently to make the frosting and then whipped it. 


 A recap of that recipe: 

Chocolate Frosting

1 cup Coconut Oil-melted
1 cup chocolate powder
1/2 cup maple syrup
1/2 teaspoon vanilla extract
Stir them together and refrigerate until solid. Put into a mixer and whip until creamy leave at room temperature. 


The Cupcakes were a bit more of an adventure because when I decided to make them the first time I was missing a banana and had to use pumpkin puree instead. I decided to add a few dates and a bit of maple syrup to compensate and they were really good. They have a bit less of a banana flavor than the original muffin recipe but still do taste like banana a bit. They are very healthy and contain no grains, dairy, or eggs.


 Chocolate Cupcakes-Vegan & Paleo


6 Medjool Dates in a liquid measuring cup then fill with simmering water up to the 1/4 cup mark. 
1 Tablespoon Maple syrup added to the dates.
2 Tablespoons ground Flax seed in 6 Tablespoons hot water. 
1/3 cup pumpkin puree
1/4 cup chocolate baking powder
1 Tablespoon Vanilla Extract
2 Bananas
1 cup almond butter (or other nut butter)
1 Teaspoon baking soda
1 Teaspoon cider vinegar


Preheat the oven to 350 degrees. Line 12 muffin tins (I highly recommend lining them not just greasing them)

Add the first 8 ingredients to a container to use an immersian blender or to a food processor. Blend well until completely smooth. Add in the cider vinegar and blend to completely mix. Spoon into muffin tin to fill muffin cups about 2/3 of the way. Bake in the preheated oven for 22 minutes. If you stick a toothpick in it will come out with a little damp chocolate on the bottom. 

Allow the cupcakes to cool completely, and I really mean completely I tried it before they were all the way cool and it didn't work, and frost with the frosting. ENJOY!


My 6 year old son wanted to take a picture of me making the cupcakes. :)